Mario.Tapilouw

Thursday, December 08, 2011

Multiple Webcam using OpenCV 2.1 and Visual Studio 2008

I just found out that it is not difficult to connect to two webcam using OpenCV and do image processing on the captured images. I used OpenCV 2.1 and Visual C++ 2008 for this program, so those who are familiar with Visual C++ 2008 should be familiar with this code. The installation and configuration of OpenCV is explained clearly in their wiki and you can follow the steps written there.

We need to create two capture objects, one for each camera:

CvCapture* capture;
CvCapture* capture2;

Also, create two IplImage objects for the two cameras:
IplImage* image;
IplImage* image2;

The CvCapture and IplImage objects have to be initialized before use, add a button to your form and add these initialization lines:
int w = 640;
int h = 480;

// creating the capture fwom webcam #1
capture = cvCreateCameraCapture(0);
capture2 = cvCreateCameraCapture(1);

// parameter setting
cvSetCaptureProperty(capture, CV_CAP_PROP_FRAME_WIDTH, w);
cvSetCaptureProperty(capture, CV_CAP_PROP_FRAME_HEIGHT, h);

cvSetCaptureProperty(capture2, CV_CAP_PROP_FRAME_WIDTH, w);
cvSetCaptureProperty(capture2, CV_CAP_PROP_FRAME_HEIGHT, h);

// initialization of iplimage object
image = cvCreateImage(cvSize(w, h), IPL_DEPTH_8U, 3);
image2 = cvCreateImage(cvSize(w, h), IPL_DEPTH_8U, 3);

Then the next thing is to declare a function for capturing the images:
private: System::Void ProcessFrame(System::Object^ sender, System::EventArgs^ e)
{ // query the frame and capture
image = cvQueryFrame(capture);
image2 = cvQueryFrame(capture2);

cvShowImage("camera 1", image);
cvShowImage("camera 2", image2);

if(blnGrabImage)
{
cvSaveImage("image_left.bmp", image);
cvSaveImage("image_right.bmp", image2);
blnGrabImage = false;
}
}

We have to register this function to be called by the system, add these lines after the initialization of the capture and the images:
Application::Idle += gcnew EventHandler(this, &OpenCVImage::Form1::ProcessFrame);

There are two important parts in this line, the first one is
Application::Idle += gcnew EventHandler
which tell the system to add an event handler to the system when the system is idle and the other thing is this part:
&OpenCVImage::Form1::ProcessFrame
which tells the system to call this function every time there's a new event in the system, in this case OpenCVImage is the name of the project, Form1 is the name of the Form, and ProcessFrame is the function that is going to be called.

So, that's it, tidy up the code a little bit and ready to run. If you're successful you'll get something like this:
1. For single camera:
2. For multiple cameras:
- left camera:
- right camera:
Left and right are seen from the objects' viewpoint facing the camera...

Good luck!

Labels: , , , ,

Monday, March 29, 2010

Real Time FFT using OpenCV

Recently I tried to combine Fast Fourier Transform with my previous webcam project with OpenCV. I use cvDFT() function to generate forward FFT of the image.

The result is surprising, it's quite fast. I tried using my Logitech Quickcam and I can generate the FFT of the image in real time. I will post the details later because I combined it from several sources and had to do some modification to make it run real time without having memory leak issues.

Here's a screenshot:

Another screenshot with a sine grating as the object. If you understand how 2D FFT works, you might have an idea whether this is correct or not.

My webcam runs 15fps and the size of the image is 320x240. I'm going for a faster and larger camera, and doing IFFT, just wait and see, hehehe... :D

Actually this is not directly related to my job, I did this mainly for fun and curiosity :D.

Labels: , , ,

Monday, October 26, 2009

Camera Calibration using OpenCV

Actually this is one of the thing that I wanted to try last two year but at that time I didn't understand how to use it so I left it. But right now I have understood how to use this, so I would like to share it with you.

The usage is very simple. If you have already succeeded with capturing webcam using OpenCV, this example will be a lot more fun than that :D.

Suppose you have already connect your webcam to be captured using OpenCV, what you need to do is preparing these variables:

int patternCol(7);
int patternRow(4);
int numOfCorner(28);
int cornerCount(0);
int nBoards(8);
int successes(0);
int step(0);
CvPoint2D32f *cornerPoints;

Remember that you need to initialize the cornerPoints using new because it's a dynamic array.

Then, you need to add these lines into the callback of your webcam, suppose the variable of your callback is image:

int found = cvFindChessboardCorners(image, boardSize, cornerPoints, &cornerCount, CV_CALIB_CB_ADAPTIVE_THRESH);
cvDrawChessboardCorners(image, boardSize, cornerPoints, numOfCorner, found);

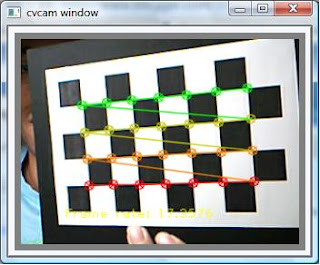
What you will see is that the chessboard corners are marked with a circle. If the circle has different colors, then it means the algorithm is successful. Something like this:

Then, the next thing you have to do is to save the position of the corners into a variable until you have enough images to perform the camera calibration. I tried using only 8 images, you can try more. I set the number of images using nBoards variable.

if( cornerCount == numOfCorner )
{
for( int i=step, j=0; j <>
{
CV_MAT_ELEM( *image_points, float, i, 0 ) = cornerPoints[j].x;
CV_MAT_ELEM( *image_points, float, i, 1 ) = cornerPoints[j].y;
CV_MAT_ELEM( *object_points, float, i, 0 ) = j/patternCol;
CV_MAT_ELEM( *object_points, float, i, 1 ) = j%patternRow;
CV_MAT_ELEM( *object_points, float, i, 2 ) = 0.0f;
}
CV_MAT_ELEM( *point_counts, int, successes, 0 ) = nBoards;
successes++;
}

Then, the next thing is to calibrate the camera using these lines of code:
CvMat* object_points2 = cvCreateMat( successes*nBoards, 3, CV_32FC1 );
CvMat* image_points2 = cvCreateMat( successes*nBoards, 2, CV_32FC1 );
CvMat* point_counts2 = cvCreateMat( successes, 1, CV_32SC1 );

// Transfer the points into the correct size matrices
for( int i = 0; i <>
{
CV_MAT_ELEM( *image_points2, float, i, 0) = CV_MAT_ELEM( *image_points, float, i, 0 );
CV_MAT_ELEM( *image_points2, float, i, 1) = CV_MAT_ELEM( *image_points, float, i, 1 );
CV_MAT_ELEM( *object_points2, float, i, 0) = CV_MAT_ELEM( *object_points, float, i, 0 );
CV_MAT_ELEM( *object_points2, float, i, 1) = CV_MAT_ELEM( *object_points, float, i, 1 );
CV_MAT_ELEM( *object_points2, float, i, 2) = CV_MAT_ELEM( *object_points, float, i, 2 );
}

for( int i=0; i <>
{
CV_MAT_ELEM( *point_counts2, int, i, 0 ) = CV_MAT_ELEM( *point_counts, int, i, 0 );
}

// At this point we have all the chessboard corners we need
// Initiliazie the intrinsic matrix such that the two focal lengths
// have a ratio of 1.0

CV_MAT_ELEM( *intrinsic_matrix, float, 0, 0 ) = 1.0;
CV_MAT_ELEM( *intrinsic_matrix, float, 1, 1 ) = 1.0;

// Calibrate the camera
cvCalibrateCamera2( object_points2, image_points2, point_counts2, cvSize( image->width, image->height ),intrinsic_matrix, distortion_coeffs, NULL, NULL, CV_CALIB_FIX_ASPECT_RATIO );

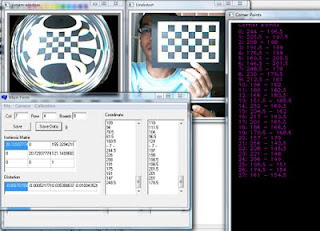
the output of the calibration is these two matrices: intrinsic_matrix, distortion_coeffs. You can save it into a file using cvSave(...) or directly call it from somewhere in your program.

These are some excerpts of the steps that I implement in my program. I followed the examples provided in Chapter 11 of OpenCV book :). If you're interested just try it :D


Wait for my next post about why this camera calibration stuff is important, hehehe... :D

Labels: , , , , ,

Wednesday, September 16, 2009

Grabbing image from webcam using OpenCV


This is fun, I have a couple of unused webcam and trying to have some fun with them. This website shows a good tutorial about grabbing image from the webcam and I followed the tutorial. It is based on OpenCV and I used Visual C++ 2005 to write the program.

Here's what I got:


Hehehe.. this is just the beginning, wait for my other projects :D

Labels: , ,